


Keto Green Chili Chicken (One Pan Recipe)
Introduction
Keto Green Chili Chicken is a brilliant weeknight recipe that shines for its bold flavors and super-simple one pan preparation. With tender, juicy chicken smothered in a creamy, zingy green chili sauce, this meal is both comforting and low carbohydrate—ideal for anyone seeking quick, healthy, and satisfying keto dinners.
Deliciously Unique Keto Green Chili Chicken
What sets this dish apart is the tangy mix of green chilies and the rich creaminess that envelops the chicken, delivering big flavor without a complicated ingredient list. All the cooking happens in a single pan, making cleanup a breeze and your whole kitchen smell amazing. This is a meal guaranteed to please the whole table, even for those not following a keto lifestyle.
A Creamy Green Chili Sauce for Maximum Flavor
The sauce combines green chilies, cream cheese, and just the right amount of spice, balancing tang with creaminess in every bite. Using full-fat dairy ensures the sauce is thick, keto-friendly, and perfectly coats the chicken. For added depth, you can mix in smoked paprika or cumin, depending on your taste preferences. The key is letting the chicken simmer until it’s infused with the chili flavors and ultra-tender.
One Pan Simplicity: How to Assemble and Serve
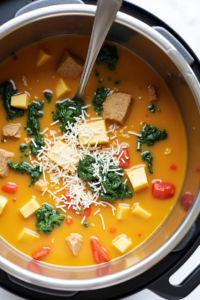
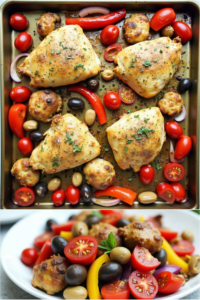
Everything cooks together in one skillet: brown the chicken, add aromatics, pour in green chilies and cream cheese, and simmer until thickened. Finish with fresh cilantro, sliced avocado, or extra lime wedges for a beautiful pop of flavor and color. Serve it straight from the skillet over cauliflower rice or simple sautéed greens for a true keto feast.
Serving Suggestions—for a Show-Stopping Keto Dinner
This dish pairs perfectly with side salads, cauliflower rice, or even low-carb tortillas for a fun taco night twist. For gatherings or meal prep, portion the chicken and sauce into containers with your favorite low carb sides. A generous dusting of chopped cilantro and fresh lime juice right before serving takes this recipe to the next level.
Nutritional Information and Serving Size
This recipe yields about 4 hearty servings, each packed with approximately 300-350 calories, 3g net carbs, and a healthy balance of fat and protein. It’s a crowd-pleaser that keeps you full, energized, and feeling great on a keto or low-carb plan.
Keto Green Chili Chicken (Recap)
Creamy, zesty, and incredibly easy—this one pan keto green chili chicken delivers restaurant-level flavors with minimal effort. Its smart combination of simple, keto-friendly ingredients has made it a top choice for anyone seeking comfort food that aligns with healthy, low-carb goals.
Ingredients
💡Meal Planning Tip: Save this recipe to automatically generate an organized shopping list with all ingredients sorted by store section—perfect for efficient grocery trips and seamless meal planning.

Instructions
- Season both sides of the chicken breasts with salt, pepper, garlic powder, and ground cumin.
- Heat olive oil in a large skillet over medium-high heat. Add chicken and sear for 4-5 minutes per side, until golden brown. Remove chicken and set aside.
- Reduce heat to medium. Add diced green chilies and chicken broth to the pan, scraping up any browned bits.
- Stir in the cream cheese. Let it melt into the broth and chilies, whisking until you have a smooth sauce.
- Return the chicken to the skillet, spooning sauce over the top. Sprinkle with shredded cheddar cheese.
- Cover and simmer for 7-10 minutes, until chicken is cooked through and the sauce has thickened.
- Top with fresh cilantro and serve with lime wedges. Add optional sliced avocado, jalapeño, or green onions if desired.
Weekly Meal Planning
This one pan dish is perfect for meal prepping and weekly dinner rotations. Save and schedule this recipe to your meal planner to automatically generate smart shopping lists and keep your week organized.
Planning Benefits:
- Automatically calculates total ingredient quantities across your planned meals
- Organizes shopping lists by grocery store section for faster shopping
- Eliminates duplicate purchases and reduces forgotten ingredients
- Keeps your weekly meal prep streamlined and efficient
Pro tip: Planning multiple keto recipes? Schedule your recipes to see overlapping ingredients, ensuring you only buy exactly what you need. This eliminates food waste and saves you money each week.
Cook and Prep Times
Prep Time: 10 minutes
Cook Time: 25 minutes
Total Time: 35 minutes
Enjoy your flavorful, low-carb, and fuss-free Keto Green Chili Chicken—an instant favorite for home cooks seeking ease and maximum taste all in one delicious skillet!